Friday 28 October 2016

Meet Alix, the 70's Dress of my Dreams

Happy fall, everyone! There are so many things that I love about this time of year, but I've been busy busy busy so this will be the sparknotes version of a blog post so I can get back to studying/finishing sewing my Halloween costume.


Pattern: the newly released Alix Dress by By Hand London. They asked me to test and I absolutely fell in love with the design!! I made the mini version with the pleats, in a size 2/6.


Fabric: Cheapo poly satin that I bought at a local clothing store that was selling off their surplus. I normally hate poly (and still do), but I needed something on short notice and it was inexpensive. The right side is super shiny (as satin tends to be...) but I used the wrong side and I'm obsessed with the rich purple colour. (It also happens to be almost the exact same colour as one of their samples. Great minds think alike?)


Muslin: I got about halfway through a muslin then realized that I cut the wrong size for the neck yoke, but didn't have time for a new one. The only thing I changed was to raise the neckline a fair bit (I think 1 3/4"), although in retrospect I didn't need to - it was only because I cut the larger size of yoke that it was so low! Next time, I might lower it back down (or at least 1") because I think that might be a little more flattering (but still totally modest).


Sewing: Sooo I may have delayed starting this until very very close to the deadline in favour of studying for my biochemistry midterm, and by the time I started, everywhere that I could buy thread was closed. I had purple thread, but it was very cheap and nasty thread that my machine really doesn't like, so I used black thread for almost the whole dress. The next morning, I ran out and bought some purple thread to hem the skirt and sew the elastic casings at the wrist.


I contemplated French seams, but I was short on time so I just serged everything. Once I got partway through, I realized that French seams would have been way too bulky anyways, so I guess that was for the best - it probably saved me a lot of frustration! If I make another one when I have a little more time (like, maybe when I graduate???), I might experiment with bias bound seams. Some of the seams end up enclosed in the yoke and the waist panel, but a lot of them are still exposed.


I haven't had a chance to compare the tester instructions to the revised ones yet, so I won't comment on the construction at all. It was pretty straightforward, although I definitely had to follow the instructions more closely that I usually would!


I finished it up with a blind hem with my beautiful blind hem foot - I'm so in love with this thing. As much as I love hand sewing, sometimes I just don't have the time or the patience for it, so it's great to have a machine that does nice blind hems.


Verdict: Guys, this is the dress of my dreams!! The fit maybe isn't 100% perfect (I need to tweak the area right above the bust), but I absolutely love wearing it and it's perfect for fall. For class/everyday life (so class + the library), I wear it with tights, boots and a jean jacket (plus a scarf and sweater underneath because it's already cold...), but you could definitely dress it up with heels and some nice jewelry. The sleeves are roomy, but in a lightweight fabric, they're not so bulky that you can't wear a sweater, which is nice.


I've also been obsessed with this scarf this fall - it's Liberty and belonged to my grandma. We found it in its original package in her house, so we think it was probably a gift that she never wore. It's beautiful wool and despite not owning (or liking) much pink, it seems to go with a lot of my clothes!


I also just realized that I'm wearing my great-grandmother's gloves in these last few photos where I was too cold to take off my jacket! We also found them at my grandma's house, but my mom doesn't fit them so she doesn't think my grandma would have either. I have no idea how old they are, but they were found with a few other pairs that I would say are at least from the 50's, possibly older. They're made in Italy and lined in silk knit and oh my gosh they are amazing to wear.


So, I think that's it for this dress! I'm completely in love with it and want to make many many more (if I only I had just a little more time...). Thank you to the lovely ladies at BHL for inviting me to test, and thanks to my friend James for taking these pictures for me, in spite of the fact that I always seem to choose rainy days for photoshoots!


Thanks also to this beautiful city for being my backdrop. In spite of the rain when we took these photos, Montreal is gorgeous this time of year!


And with that, I'm heading back to the library. At least I'm wearing a killer dress!

Saturday 6 August 2016

Pattern Testing: Itch to Stitch Belize Shorts

I'd be lying if I said that Montreal hadn't changed me - I've grown a lot and I've had to learn to live on my own in this city. Living here over the summer this year has been a completely different experience for me - but I've definitely had to get used to the heat, and my wardrobe has changed a lot from my past summer wardrobes.


With buying second-hand and altering old garments, I've managed to put together enough of a wardrobe that works for the heat (and my lab job, where I need to wear long pants), but something I was still missing was shorts. The only pair of shorts that I wear regularly are a pair of hand-me-downs from a friend, and while I love them and wear them all the time, they do occasionally need a break to be washed...

So, when I saw that Kennis from Itch to Stitch was looking for pattern testers for her Belize Shorts and Skort pattern, I put my name in right away, and I was chosen as a tester!


The shorts are loose-fitting with an elastic waist, but the front waistband isn't gathered so they're quite flattering. I chose view A, with pleats at the front, and made a size 0. I was in between a size 0 and a size 2 at the waist, but closer to a size 0, and I was smaller than a size 00 at the waist, so I chose the size 0. I cut the elastic the size for the 00 as the instructions recommend, although next time I will actually size down to a 00 or a little smaller at the waist.


I cut a muslin, and I was really happy with the fit! I didn't have to adjust the crotch curve at all, which is possibly a first for me, so I went ahead and cut into my fabric.

These don't take very much fabric (about 3/4 of a metre in my size), so I was able to make these out of the leftover fabric from my sleeveless Granville Shirt.

For the pockets, I used a scrap of black lining, although maybe gray would have been better - I was just in a hurry and that's what I had on hand!

I followed the directions pretty much exactly until they were finished, but I wanted them a little shorter, so I folded up 1 1/4" cuffs. The hem allowance was just deep enough for this (1 3/4"), but next time I would allow a deeper hem allowance so there's more than 1/2" folded under.


I also had to shorten the pockets a little, so they didn't poke out. I only shortened them 1/2" because I like deep pockets, but they're only just short enough, so next time I would probably shorten them another 1/2".

Since it was a test version, I took some photos before turning up the cuffs, and some after! Once the photos were taken, I tacked them in place.


I also added a line of vertical stitching at the centre back to stop the elastic from rolling in the casing, but this still wasn't quite enough, so I added three lines of horizontal stitching along the whole waistband, to look more like shirring. I really like how this turned out! My fabric has a fair bit of body for a lightweight fabric, so I spaced the lines 3/8" apart, but in something like rayon, you could probably sew them even 1/4" apart.

All in all, I LOVE these shorts! They have enough ease to me comfortable (and the elastic waist helps!), but they're just fitted enough to be flattering (although having said that, a lot of the testers did size down for a slightly slimmer fit - I went down a half size myself).


The herringbone chambray pattern looks almost a little like suiting from a distance, so these will be great to dress up or dress down. The linen and the loose fit make these perfect for the hot, humid Montreal summer, but I also think I'll be able to make these work for fall with tights.


I could also potentially wear these with my Granville shirt if I want to be super matchy-matchy (or I could just pretend it's a romper). I haven't tried this yet but I might just see how it looks!


This is also the first project that I finished off with a custom label from Dutch Label Shop - they contacted me a while back to ask if I'd like some custom labels to try, and of course I said yes! I've always loved the idea of adding labels to my clothes, but I've never gone out of my way to buy them.


I went with a few different kinds of simple ones, but if you're better with Photoshop than I am, you can also submit a custom design rather than just designing them on their website.

I'm seriously impressed by the quality and how professional these look. I'm going to love adding them to everything I make from now on! Since they're made-to-order, they do take a little while to arrive (I think I received them about two weeks after ordering, including shipping to Canada), and you do have to order quite a few labels at once (at least 30 for the simple kind), but now I have enough labels that I'll be using them for a very, very long time! They're a really nice finishing touch, and they makes me smile every time I wear these shorts!


If you'd like some custom labels for yourself, Dutch Label Shop has kindly offered a 15% discount to my readers with the code youngseamstress, valid until September 5th. Treat yourself!

(And a little disclaimer: I received my labels for free, but all opinions are my own, and there are no affiliate links in this post - i.e. I'm not receiving any compensation for posting about them or the discount code. I do really love them though!)


Another huge thank you to Kennis at Itch to Stitch for asking me to test! I love this pattern and I'll definitely try to make more before the summer is up. They come together so quickly and they're really easy to wear! I might also try view E with the skort.


(And a second little disclaimer: I received the pattern for free in exchange for feedback, but again, these opinions are my own. I'm so, so happy with this shorts and I kind of want to live in them for the rest of the summer!)

Hope you're having a nice, sunny weekend! Thanks for reading!

Saturday 16 July 2016

New Hair + My Linen Granville Shirt

You know that feeling when you make something, and it actually turns out exactly how you pictured it and then you're convinced that you have the perfect piece of clothing that you would wear every single day if you could get away with it??


Well, meet my Granville Shirt! I made this a couple weeks ago and I'm so incredibly happy with it that I want to make hundreds more of these and completely would if I had the time.


Also, you might have noticed that I dyed my hair! If you follow me on Instagram or if you saw my Me-Made-May round-up, you probably know that I've actually had red hair for a few months now. When I first dyed it I used a kit (and a friend!), and it was right after my exams when I felt like I really needed a big change.

It was a little impulsive (not really like me!) and I was happy with how it turned out, but I realized that I maybe had a little too much hair to dye with a drugstore kit. Just last weekend, I had it done by a hairstyling student for a great price (less than I spent on drugstore dye!) and I'm SO happy with it. I love my natural colour but I'm ready to have fun with some different colours!


Anyways, back to the shirt!


It seems like a classic shirt has been on my sewing bucket list foreeever, and when Sewaholic released their Granville Shirt pattern last year, it seemed like it really was the perfect shirt! It has the perfect amount of ease and all the right details. Sewaholic patterns usually fit me pretty well, too, so it seemed like a great starting point.


When I made the muslin, though, it really needed some work. I don't have pictures, but the dart was completely in the wrong place for me, and the armholes were gaping like crazy, even after making the same alterations that Tasia made to make it sleeveless! It was also way too long, almost a tunic length, and big at the hips (although I expected that based on the sizing). I shortened it 4", but I ignored the shorten/lengthen lines because I needed the shaping at the waist to be higher. I cut two separate lines, one above the waist and one below, and shortened it 2" at each of them. To take it in at the hips, I just marked 1" in and drew a smooth curve to that point from the waist.

To make it sleeveless, you have to shave a little off the armholes and the shirt back where it attaches to the yoke - this tutorial explains it well. Tasia says she took the armholes in 1" and took 3/8" out of the back, but this wasn't nearly enough for me. I haven't made the shirt with sleeves, so I think I probably would have had to take in the shoulder and the back anyways - that's a pretty standard adjustment for me. In the end I took 1 3/4" out of the shoulder and 7/8" out of the back pieces.

For the dart, I started by raising it 1", but I needed to do something to fix the armhole gape. One of these days, I should probably learn to do a proper FBA, but I don't like how every tutorial I've seen ends up making the rest of the top wider at the bottom. Instead, I followed this tutorial on how to stop armhole gape - you basically pin a dart in the armhole where you would need it, and then transfer it to the bust dart. It basically doubled the size of the dart, and it worked really well to fix the gaping!


I made a second muslin with all these adjustments, and it was a lot closer, but there was still a little gaping in the back of the armhole. I considered doing the same thing with pinning a dart and somehow transferring it to the princess seams in the back, but this article said to just take a little out of the side seam for the back piece only so I did that for my final version. This also worked really well, although it made it just a tiny bit too small at the bust so I might try to add that back in somewhere for my next version. I didn't notice it at first, but after a little wear, the button band pulls ever so slightly at the bust.


Other than that, though, can we just admire the fit? I think I pretty much nailed it! There's a couple small things I'll change next time, but it's probably the best fitting shirt I've ever owned. It's a little wrinkled in these photos because I'd been wearing it all day, but that's just the nature of linen.


The fabric is a linen blend herringbone chambray that I bought on St. Hubert at the beginning of the summer. It was only $10 a metre and I got the whole top out of only a metre! Now I just need to figure out what to do with the metre I have left...


I've never made a classic shirt before, but it wasn't as difficult as I was expecting. I was mostly nervous for the collar stand but I followed Andrea's famous tutorial for sewing one and it went quite well! The only problem was that something must have stretched (or I just didn't cut it accurately enough in the first place), because I found the collar to be a little too long for the collar stand. I noticed it early on but somehow thought it would work itself out, so I didn't trim it down. It's mostly fine, but if I ever want to button it up all the way (which I never do), the collar overlaps slightly.

I also made a mistake and interfaced both the upper and lower collar by accident, because I wrote "Cut 2 interfacing" on the collar piece when I traced it. I keep meaning to check if this was my mistake or something on the pattern itself. It's not a big deal because the interfacing I used was pretty lightweight, but it would probably sit a little more nicely with slightly less.


As for the rest of the construction, I used flat-felled seams for everything so the insides are nice and neat.

To finish the armholes, I used store-bought bias binding because I was lazy and just sewed it with a 1/4" seam allowance, folded it over the raw edge, pressed it to the inside, and edgestitched. Easy peasy! I think the bias binding I used was maybe a little too stiff for the fabric (I think it's mostly poly), because it didn't stretch to the curve as nicely as a softer one would, and the edges don't quite lay flat. I don't think it's that noticeable, but next time I'll make my own. In fact I think I may just buy some black and white cotton and make a bunch of my own so I have a stock for times like this! The homemade stuff is so much nicer, even if it's not in matching fabric.


I used my machine's automatic buttonhole foot to make the buttonholes, and I can't get over how beautiful they are. This is probably one of my favorite features of this machine, because I've always struggled with making nice buttonholes. The only one that was a little wonky was the one at the very top because I don't think I trimmed down the seam allowance enough when I attached the collar, so there was a little too much bulk to make a smooth buttonhole. In the end, I just didn't cut it open because I'm never going to button up that button anyways!


I'm so, so happy with how this shirt turned out. It's a great summer style for throwing on over jeans or these rayon Value Village pants that I've been living in. It's so cool and comfortable for the Montreal heat, too! I've already worn it so much and I want to make more. In the fall I might try a version with sleeves, although sleeveless versions are almost more practical for layering cardigans over!


Next up, I'd love to make a shirtdress version! Stay tuned...

Friday 17 June 2016

The Little Black Bra

I guess I'm very late to the Watson bra party - I saw so many versions last summer, but I was far too busy with other sewing to have time to make a bra. I was also more interested in making a classic underwired bra, and working up to making foam-cup bras. Now, though, constantly changing bra sizes and being fed up with uncomfortable wired bras has made me crave comfy yet cute bras like the Watson.


I've always had trouble finding bras that fit, and although I finally had some in high school, I lost some weight in first year, and I've been slowly gaining it back over the course of the year. After losing all the weight, I bought a couple new bras, only to have them not fit anymore after gaining the weight back! For a while, I wore my old bras from high school, but they're old enough that the bands are super stretched out of shape.

So, some better-fitting, comfortable bras were definitely in order! Enter the Watson bra. 


This one was intended as a wearable muslin, because the fabric was a remnant that I bought on St. Hubert for $2, and I didn't have all the notions that I needed. I had the elastics for the top and bottom, but I couldn't find black strapping, or a 3-row hook and eye. 

Because of this, I modified the pattern to just pull over my head, and I made non-adjustable fabric straps. This worked pretty well, although for my next one, I'm going to try to find the proper notions!


I wasn't sure what size to make (like my last bra), since the directions are for measuring your underbust and full bust to choosing your size. I wear a 28E in my RTW bras, but measuring this way gives me a completely different size. In the end I just went with a 30D, which is the smallest band size the pattern offers, but an equivalent cup size to what I've been wearing. I'd say the fit it pretty much spot on!

To make it pullover, I cut the back pattern piece on the fold about 1" away to compensate for not having a hook and eye there.

For the straps, I made a strip 1 1/2" wide and serged the edges together with a 1/4" seam allowance to give a 1/2" strap. I made it about 30" long, but cut a good 10" off. When I attached it, I attached it to the back first, then pinned them at a good place in the front. They seem pretty solid, so I don't think they'll stretch out too much, but I think for my next one, I'll definitely get some proper strapping. These are a little bulky, especially where they attach to the cups.

Amy suggests using powernet for the band and either lining or interfacing the cradle, but I could only find beige powernet. Instead, I used a double layer of the main fabric and for the cradle, I sandwiched a single layer of powernet in between. I think this gave it the perfect stability, although it's maybe a little bulkier than ideal, and the beige powernet shows a little at the seams. I may have to get out my sharpie...


As for the rest of the construction, I followed the instructions and used a stretch stitch on my machine (a new stitch for me!) for both the seams and the topstitching. I love that there are exact widths and lengths included in the instructions for attaching the elastic, because a "medium width zigzag" means something different to everyone!


Overall, I had this bra put together in an afternoon, from cutting to finishing. It's definitely not my best sewing - you may have noticed the wonky stitching along the bottom elastic where my bobbin thread ran out and I started again. I found that the double layer of ponte folded over, plus elastic, was too bulky to nicely fit under my walking foot so I accidentally started it on a bit of an angle. I didn't really want to rip out a triple-step zigzag (backstitched) in a knit, and this was a wearable muslin anyways, so I left it. If I had known how well this would turn out I might have tried to fix it!


All in all, I LOVE this bra! It's so comfortable, and still really supportive and cute. Unfortunately the elastics that I used weren't the best quality and the edges have already started to stretch out a bit... I also could have probably stretched them more as I sewed them. For next time, though, I've ordered a ridiculous amount of elastic and lingerie elastics from Bra-Makers Supply to stock up. I should be set for another 10 or so bras...


And yes, there will definitely be more! Don't say I didn't warn you...

Friday 10 June 2016

Me-Made-May 2016: The End?

Am I the only one who went to take yet another mirror selfie on June 1st, before realizing that is wasn't Me-Made-May anymore??

Despite easing up on my Me-Made-May goals a little this year, I actually did manage to wear something I made every day, and documented it on Instagram rather than doing a weekly blog post. I missed a couple days, but all those days I was wearing an repeat outfit anyways!

These are some of my favourites - but you can see them all on Instagram!


My main (vague) goal was to find more ways to work my me-mades into my wardrobe, especially my wardrobe for working in the lab. I thought about this a lot, and I did find some new ways to wear things!

A photo posted by Shannon (@youngseamstress) on

This Pendrell blouse that I made from vintage fabric (that belonged to my great-grandma!) has sat unworn for a very long because it just felt too over-the-top cutesy, but with these casual linen shorts that my friend passed on to me (rather than a full skirt), it dresses it down and feels way more wearable!

Another top that I played with some new ways to wear was my recent Sarah Shirt, which I love, but maybe isn't the most flattering on me. I realized that I really like wearing it open, though! The top is buttoned in this photo to stop it blowing open on my bike, but I later unbuttoned it. Worn over a tank top, it's still swingy and fun but not quite as overwhelming on my small frame!


A photo posted by Shannon (@youngseamstress) on

That said, I definitely fell back on a few favourites when I didn't really want to think about putting an outfit together. My most worn piece was definitely my Sutton blouse (on the left below), which didn't surprise me at all! I wore it at least four times (one undocumented), and I may have even worn it on a fifth day that I also forgot to take a picture of. It's the perfect top to just throw on over jeans, or tuck into a skirt, and it can be dressed up or down!

A photo posted by Shannon (@youngseamstress) on

It's funny, because the only reason I made that pattern was because it was chosen for me as part of the Super Online Sewing Match! I never would have picked it out on my own, but I wear it so often and really should make another.

As for my other goals, I wanted to finish my alterations, focus on wearing and making (or planning to make) separates, and learn to copy patterns.

So... I sort of achieved those. I did get through a few alterations, but I still have quite a few to go. I shortened both my floral Moneta dress and my purple Peter Pan collar Moneta dress, which makes them both a little more wearable somehow. I wore both a couple times, and I also realized that I can wear my floral boatneck backwards to make into a scoopneck, which makes it a little less dressy! Here I wore it for a picnic in the park, with my wool Jenna cardi because it was still a little cool that day.

A photo posted by Shannon (@youngseamstress) on

I definitely focused on wearing separates for the lab, because I have to wear pants for safety and practicality. I wore skirts with tights at the beginning of May when it was cool, but I hate wearing tights in hot weather!

A photo posted by Shannon (@youngseamstress) on

(Quick side note: another piece that I never would have imagined that I would wear so much is the denim jacket I'm wearing above! I bought it second-hand from a Facebook group where McGill students buy and sell clothes, and it seems to go with everything I own. It's a perfect spring or summer jacket, and great for dressing down some of my old clothes! Not me-made, but I know that if I ever make a denim jacket, I'll wear it tons.)

Lastly, I wanted to learn to copy patterns and draft some simple ones! I'm still working on this - I have a couple patterns that I've copied, but I haven't made them yet so I still don't know how good a job I did....

Overall, I can't say I actually learned a ton from Me-Made-May this year that I didn't know already. I learned that I'm much more drawn to loose, more casual shapes now, but I knew that already. I also figured out some new ways to wear old pieces that I haven't worn in a long time, which was something I've been trying to do for ages and this gave me a bit of a push to actually do it!

On the other hand, I'm realizing now that there were a lot of pieces I never wore once, like my denim Hollyburn skirt (even after shortening it, I feel like I'm 7 years old when I wear it!), both pairs of Smooth Sailing Trousers (my black pair needs re-hemming after stretching, and my teal pair... I just never really reach for them, I guess), my linen culottes and my green Moneta dress (these I forgot to unpack when the weather got nice - I actually do wear them in the summer!), my Davie dress, and my Natalie dress (both of these were great work dresses last summer, but just don't feel like they're my style anymore!).

Some other pieces that are still in my mending pile are both my Cambie dresses (to shorten), my picnic blanket skirt (also to shorten), the top from my Miz Mozelle set, and some other thrifted pieces.

I thought that I would finish this post and feel like I'd gotten somewhere or had some sort of revelation about my handmade wardrobe, but I'm not sure I learned that much that I hadn't figured out already. My wardrobe is definitely in a bit of a transition state, and that's okay! I'm figuring out what works for me and my lifestyle right now, and filling some gaps both with sewing and thrifting.

The main gaps are practical, comfortable pants; loose, casual tops that I can wear for summer and layer over in the winter; and basically anything that doesn't make me feel like I'm five!

So, this wasn't exactly the insightful post that I thought it would be, but nonetheless, I had fun participating in Me-Made-May, even though I got a little sick of all the selfies by the end!

How about you? if you participated this year, did you find any gaps in your wardrobe, or learn anything new about your style!

Monday 23 May 2016

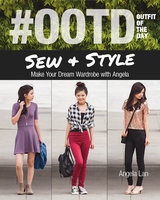
#OOTD Sew and Style - Review + Giveaway!

As someone who got into sewing in their teens, I'm all for anything that encourages young people to start sewing their own clothes! Back at my high school, everyone takes half a term of sewing, and they make a pincushion, a stuffed frog, and a pair of boxer shorts... which doesn't exactly make most people want to keep sewing. Making clothing that you actually wear and love is so more fun!

That's exactly the idea behind the new sewing book #OOTD (Outfit of the Day) Sew and Style, by Angela Lan. Today, I'm excited to be hosting the a stop on the blog tour for the book, including a giveaway at the end of this post!


What impressed me most when I learned about the book is that Angela is only 14 years old, and already writes her own blog at LoveSpunk.com! She's mostly self-taught, and was inspired to write the book because when she was learning, she found there was a lack of sewing books for young girls that focus on sewing clothing rather than other crafty projects.

The book is aimed at young teenagers and tweens that are interested in clothing design, so the emphasis is a little different than other beginner sewing books that I've seen. I liked that in her introduction, Angela focuses on sewing wearable, everyday clothing and finding ways to make it your own - that's exactly what I'm trying to focus on with my sewing right now, even though I've been sewing for years! 

There's a great introduction to different types of fabric and what to look for when fabric shopping, as well as a helpful guide to reading a sewing pattern. The sewing details are concise, and enough to get started with the included projects.


As you go through the book, Angela introduces some new techniques that are needed for the projects, and along the way, she talks about sewing to fit your style and create unique clothing, and introduces a few pattern modifications for the included projects.

The projects are all pretty simple and perfect for a beginner! They get more complex as you go through the book, starting with an infinity scarf, and ending with a pair of shorts that can be lengthened to pants. Most of them, with the exception of the pants, don't require many more skills than sewing and finishing straight seams. The pants would definitely be a project to work up to, but mostly because they would be trickier to fit! The construction itself looks quite straightforward.

Overall, I think that this book would be perfect for a tween or teen that wants to start sewing clothing rather than those classic beginner projects like pillowslips and pincushions! Everything is explained clearly and simplified just enough to make the projects very do-able for someone younger. It doesn't include many techniques other than what's needed for the projects, but it's a perfect starting point to build upon if you worked through the projects and wanted to learn more, either from the Internet, from a course, or from another book.


So, now for the giveaway! C&T Publishing has kindly offered a copy to give away to a reader (a paper copy if you're in the US, and an e-book otherwise). To enter, leave a comment with an email address, and I'll keep it open until Monday, May 30 at mighnight, EST.  Edit: giveaway is now closed. 

Following me (on Bloglovin, Feedly, Instagram, or anything else) is appreciated but not necessary to enter!

Also, check out the other stops on the blog tour for more posts (and more chances to win!):

May 17: Angela Lan posting on the C&T Publishing blog
May 18: Marte Lambin at the Compagnie M blog
May 19: Sasha Werner at Secondo Piano 
May 20: Barbara Emodi at Sewing on the Edge
May 23: Me!
May 24: Suzannah Stanley at Create/Enjoy
May 25: Angela Lan posting at LoveSpunk


And finally, a little disclaimer: I was given a free copy of the e-book for the purposes of this tour, but all opinions are my own. As a fellow teenage seamstress (for another couple months, anyways), I think that this book really would be a great introduction to sewing for a tween or young teen. I would have loved it when I was that age, and I probably would have started sewing seriously a lot sooner!

Thursday 12 May 2016

Pattern Testing: The BHL Sarah Shirt

If you follow the By Hand London blog, you may have seen that I was included in their round-up of pattern tester versions of their new pattern, the Sarah Shirt! I was so flattered and excited when they asked me to test earlier this year, and it was perfect timing, because I was just starting second semester and not (too) busy with school yet. I'm definitely starting to embrace some looser, more casual styles, and I fell in love with the line drawings!


Having said that, my secret shame at that time was that I still hadn't bought a table to set up my new sewing machines, and I hadn't tried either of them yet! So, for that week, I took over our kitchen table at our apartment and finally used my brand new sewing machine machine for the first time.

Aaaand... it's amazing! It handled the drapey rayon so nicely (although the walking foot helped!), and the automatic buttonhole feature is just beautiful. Having only ever sewed on either a cheap machine or a machine that's 30+ years old, it was incredible to sew on such a high-end machine! I feel like this will be the start of a long, happy relationship. Now it just needs a name...


The fabric was from a place on St. Hubert, one of Montreal's fabric shopping districts. It's super cheap rayon and I don't know how well it will last, but I was a little pressed for time and didn't want to spend a ton of money on a shirt that I wasn't sure would turn out. This was only $3 a yard, so I bought lots, and I have enough left for a dress! I really like the pattern so I may whip up something simple with what's left - since it's not the best quality I wouldn't want to make anything super complicated with it. I bought the Sewaholic Nicola Dress pattern a while back and I might use it for a wearable muslin. We'll see!


As for the Sarah shirt, I made a size 2/6, view 2 (short sleeves, and a pointed collar). I also love the long sleeves, but I didn't think they would be that practical for me. I'm always cold, so I never end up wearing shirts that I can't layer a sweater over!

I'm not going to comment too much on the instructions, since I know that the ladies at By Hand London made quite a few changes in response to testers' feedback. The revised instructions have clarified a few points, and they're detailed enough that they're really easy to follow, even if you've never made a shirt before!

Since our kitchen table only had enough space for one sewing machine, I didn't set up my serger for this project, and instead finished everything with French seams. This is definitely my favourite seam finish for delicate fabrics, and it worked really well for this pattern, even the sleeves!


As for the fit, this one has a LOT of ease! It's intentional (unlike the Big 4, which add unnecessary easy to everything), but I thought that it ended up a little bigger than the line drawings suggested. The illustrations on the model show the ease a little more accurately, but they weren't done yet when I tested it!


I love the swingy-ness of the style, but I'll admit that I'm not sure it's the most flattering on me. I've seen lots of versions that look fabulous, but I just have a very small frame, and I think that the ease is a little overwhelming on me. The smallest size fits my full bust and waist measurements, but I think my high bust measurement better reflect the size of my frame, so I maybe should have sized down past the smallest size!

Having said that, I think it's a really fun style to wear! As I mentioned earlier, I've really started to like styles that are less fitted (even if they're not the most flattering on my body).


I think that if I made this again, I might make it a tiny bit more fitted under the arms and then begin the flare from there, possibly adding a bust dart. I think that on me, this might make the ease a little less overwhelming - I have a thrifted blouse that fits like this that I love!

I shortened it by 2", which wasn't unexpected because I'm a little short (5' 2", for reference).


The other alteration that I would make if I made it again would be to make the collar a little smaller. I'm not sure if it's just because I made the smallest size and the collar size doesn't change much from size to size, but I found the collar a little disproportionately big, and definitely larger than the line drawings suggest - it actually covers the pleats completely, which is too bad because they're my favourite part!

So, the final verdict on this shirt?


Looking at these photos, I LOVE it!

But, as much as I like it, it's definitely a stretch from styles I've worn before. I feel like I still need to just get a little more comfortable wearing it - I have a few pieces that I've bought second-hand that I loved, but were very different than the styles I was used to, and I needed to wear them a few times before I got used to the different style.


I really hope that I get some more wear out of it, because really do like it! I think with a couple tweaks I will definitely make the pattern again, and then maybe I'll find it a little more wearable.


Oh, and in case you're wondering, I have actually set up a sewing space for myself in my bedroom! It still needs a little work but it'll evolve as I use it. So far my work schedule has been a little unpredictable, but I hope to have some more sewing time this summer than I had during the school year. It looks like I'll definitely have some knitting time if I keep a knitting project at the lab - lab work involves a lot of waiting!

Also, another huge thank you to my friend James for taking these photos for me - these were taken before it started pouring!


And, a final little disclaimer: I was given the test version (and later the revised version) of the pattern free of charge in return for my feedback as a tester. I paid for the supplies and for printing the pattern myself, and I was in no way obligated to post about it. All opinions are my own!