Monday 23 May 2016

#OOTD Sew and Style - Review + Giveaway!

As someone who got into sewing in their teens, I'm all for anything that encourages young people to start sewing their own clothes! Back at my high school, everyone takes half a term of sewing, and they make a pincushion, a stuffed frog, and a pair of boxer shorts... which doesn't exactly make most people want to keep sewing. Making clothing that you actually wear and love is so more fun!

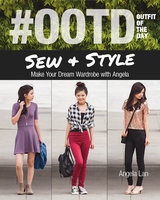
That's exactly the idea behind the new sewing book #OOTD (Outfit of the Day) Sew and Style, by Angela Lan. Today, I'm excited to be hosting the a stop on the blog tour for the book, including a giveaway at the end of this post!


What impressed me most when I learned about the book is that Angela is only 14 years old, and already writes her own blog at LoveSpunk.com! She's mostly self-taught, and was inspired to write the book because when she was learning, she found there was a lack of sewing books for young girls that focus on sewing clothing rather than other crafty projects.

The book is aimed at young teenagers and tweens that are interested in clothing design, so the emphasis is a little different than other beginner sewing books that I've seen. I liked that in her introduction, Angela focuses on sewing wearable, everyday clothing and finding ways to make it your own - that's exactly what I'm trying to focus on with my sewing right now, even though I've been sewing for years! 

There's a great introduction to different types of fabric and what to look for when fabric shopping, as well as a helpful guide to reading a sewing pattern. The sewing details are concise, and enough to get started with the included projects.


As you go through the book, Angela introduces some new techniques that are needed for the projects, and along the way, she talks about sewing to fit your style and create unique clothing, and introduces a few pattern modifications for the included projects.

The projects are all pretty simple and perfect for a beginner! They get more complex as you go through the book, starting with an infinity scarf, and ending with a pair of shorts that can be lengthened to pants. Most of them, with the exception of the pants, don't require many more skills than sewing and finishing straight seams. The pants would definitely be a project to work up to, but mostly because they would be trickier to fit! The construction itself looks quite straightforward.

Overall, I think that this book would be perfect for a tween or teen that wants to start sewing clothing rather than those classic beginner projects like pillowslips and pincushions! Everything is explained clearly and simplified just enough to make the projects very do-able for someone younger. It doesn't include many techniques other than what's needed for the projects, but it's a perfect starting point to build upon if you worked through the projects and wanted to learn more, either from the Internet, from a course, or from another book.


So, now for the giveaway! C&T Publishing has kindly offered a copy to give away to a reader (a paper copy if you're in the US, and an e-book otherwise). To enter, leave a comment with an email address, and I'll keep it open until Monday, May 30 at mighnight, EST.  Edit: giveaway is now closed. 

Following me (on Bloglovin, Feedly, Instagram, or anything else) is appreciated but not necessary to enter!

Also, check out the other stops on the blog tour for more posts (and more chances to win!):

May 17: Angela Lan posting on the C&T Publishing blog
May 18: Marte Lambin at the Compagnie M blog
May 19: Sasha Werner at Secondo Piano 
May 20: Barbara Emodi at Sewing on the Edge
May 23: Me!
May 24: Suzannah Stanley at Create/Enjoy
May 25: Angela Lan posting at LoveSpunk


And finally, a little disclaimer: I was given a free copy of the e-book for the purposes of this tour, but all opinions are my own. As a fellow teenage seamstress (for another couple months, anyways), I think that this book really would be a great introduction to sewing for a tween or young teen. I would have loved it when I was that age, and I probably would have started sewing seriously a lot sooner!

Thursday 12 May 2016

Pattern Testing: The BHL Sarah Shirt

If you follow the By Hand London blog, you may have seen that I was included in their round-up of pattern tester versions of their new pattern, the Sarah Shirt! I was so flattered and excited when they asked me to test earlier this year, and it was perfect timing, because I was just starting second semester and not (too) busy with school yet. I'm definitely starting to embrace some looser, more casual styles, and I fell in love with the line drawings!


Having said that, my secret shame at that time was that I still hadn't bought a table to set up my new sewing machines, and I hadn't tried either of them yet! So, for that week, I took over our kitchen table at our apartment and finally used my brand new sewing machine machine for the first time.

Aaaand... it's amazing! It handled the drapey rayon so nicely (although the walking foot helped!), and the automatic buttonhole feature is just beautiful. Having only ever sewed on either a cheap machine or a machine that's 30+ years old, it was incredible to sew on such a high-end machine! I feel like this will be the start of a long, happy relationship. Now it just needs a name...


The fabric was from a place on St. Hubert, one of Montreal's fabric shopping districts. It's super cheap rayon and I don't know how well it will last, but I was a little pressed for time and didn't want to spend a ton of money on a shirt that I wasn't sure would turn out. This was only $3 a yard, so I bought lots, and I have enough left for a dress! I really like the pattern so I may whip up something simple with what's left - since it's not the best quality I wouldn't want to make anything super complicated with it. I bought the Sewaholic Nicola Dress pattern a while back and I might use it for a wearable muslin. We'll see!


As for the Sarah shirt, I made a size 2/6, view 2 (short sleeves, and a pointed collar). I also love the long sleeves, but I didn't think they would be that practical for me. I'm always cold, so I never end up wearing shirts that I can't layer a sweater over!

I'm not going to comment too much on the instructions, since I know that the ladies at By Hand London made quite a few changes in response to testers' feedback. The revised instructions have clarified a few points, and they're detailed enough that they're really easy to follow, even if you've never made a shirt before!

Since our kitchen table only had enough space for one sewing machine, I didn't set up my serger for this project, and instead finished everything with French seams. This is definitely my favourite seam finish for delicate fabrics, and it worked really well for this pattern, even the sleeves!


As for the fit, this one has a LOT of ease! It's intentional (unlike the Big 4, which add unnecessary easy to everything), but I thought that it ended up a little bigger than the line drawings suggested. The illustrations on the model show the ease a little more accurately, but they weren't done yet when I tested it!


I love the swingy-ness of the style, but I'll admit that I'm not sure it's the most flattering on me. I've seen lots of versions that look fabulous, but I just have a very small frame, and I think that the ease is a little overwhelming on me. The smallest size fits my full bust and waist measurements, but I think my high bust measurement better reflect the size of my frame, so I maybe should have sized down past the smallest size!

Having said that, I think it's a really fun style to wear! As I mentioned earlier, I've really started to like styles that are less fitted (even if they're not the most flattering on my body).


I think that if I made this again, I might make it a tiny bit more fitted under the arms and then begin the flare from there, possibly adding a bust dart. I think that on me, this might make the ease a little less overwhelming - I have a thrifted blouse that fits like this that I love!

I shortened it by 2", which wasn't unexpected because I'm a little short (5' 2", for reference).


The other alteration that I would make if I made it again would be to make the collar a little smaller. I'm not sure if it's just because I made the smallest size and the collar size doesn't change much from size to size, but I found the collar a little disproportionately big, and definitely larger than the line drawings suggest - it actually covers the pleats completely, which is too bad because they're my favourite part!

So, the final verdict on this shirt?


Looking at these photos, I LOVE it!

But, as much as I like it, it's definitely a stretch from styles I've worn before. I feel like I still need to just get a little more comfortable wearing it - I have a few pieces that I've bought second-hand that I loved, but were very different than the styles I was used to, and I needed to wear them a few times before I got used to the different style.


I really hope that I get some more wear out of it, because really do like it! I think with a couple tweaks I will definitely make the pattern again, and then maybe I'll find it a little more wearable.


Oh, and in case you're wondering, I have actually set up a sewing space for myself in my bedroom! It still needs a little work but it'll evolve as I use it. So far my work schedule has been a little unpredictable, but I hope to have some more sewing time this summer than I had during the school year. It looks like I'll definitely have some knitting time if I keep a knitting project at the lab - lab work involves a lot of waiting!

Also, another huge thank you to my friend James for taking these photos for me - these were taken before it started pouring!


And, a final little disclaimer: I was given the test version (and later the revised version) of the pattern free of charge in return for my feedback as a tester. I paid for the supplies and for printing the pattern myself, and I was in no way obligated to post about it. All opinions are my own!

Saturday 7 May 2016

The Aiken Pullover... Just in Time for Summer!

If you've been following my Me-Made-May 2016 pictures on Instagram, you might have seen that I wore a new handknit sweater on day 1! It's not actually that new - I finished it in January but it took me a while to get photos taken.


This is my second handknit sweater, and I'm SO happy with it! It's the Aiken sweater by Andi Satterlund - a fitted pullover with a beautiful lace detail at the neck. I wish we had a chance to get some close-up photos of the lace, but a thunderstorm came along just as we started taking pictures so we finished up pretty quickly!


I started this project pretty much right after finishing my Marion cardigan, in February last year! It went pretty quickly at first, and I had the body finished in a couple of months. It just took me forever to knit the sleeves! I barely knit at all over the summer because I was focusing entirely on work and sewing for the Super Online Sewing Match, and then I really struggled to find time for knitting during first semester. After finishing up knitting some Christmas presents, I worked on this a lot over Christmas break, and finished up early in January.


It wasn't a difficult knit - like most of Andi Satterlund's patterns, it's knit mostly in stockinette from worsted weight wool, so it goes really quickly, once you actually make the time to knit! I had never done any lace before, but I picked it up pretty quickly and the pattern wasn't difficult to keep track of. Once you get past the lace, it's just knitting in stockinette in a circle with decreases every few rows. Great mindless knitting!


The wool is Malabrigo twist, a gorgeous merino in the colourway 'Velvet Grapes'. It was on sale at a store that was closing in Canmore, when we visited the summer before I worked there. I love Malabrigo, but it's pricey at regular price, especially if you buy enough for a sweater, so this was a great find! I bought 6 skeins, which was everything she had left, but I only used 5. I'll have to use the rest for a cozy scarf or something in the fall!

Malabrigo doesn't give a very specific gauge for their wool, so I tried a couple swatches with different size needles to see what I liked the texture of. Using 5 mm needles as suggested gave me the texture I wanted (thick, and therefore warm!), but the gauge was a little tighter than recommended. If I went up a needle size, it wasn't as thick as I wanted it, so instead, I took a bit of a gamble and just made a size larger than I normally would (small rather than extra small). I know that this probably isn't the best way to adjust, but it worked really well in this case! I don't think there's anything I would change about the fit.

I think the only thing I would change if I made this again would be to knit the ribbing on a size smaller needles - I know that a lot of patterns have you do this, and I'm not sure why hers never recommend it (maybe it's assumed?). I think I'd prefer the look of a slightly tighter rib, especially at the sleeves.


The trickiest part of knitting the sweater was trying to prevent striping! Since the yarn is hand-dyed, I alternated skeins throughout the whole sweater (except for the short rows at the sleeve head), but I still had some striping, so I had to keep cutting the wool and trying to start using it again when it was a different colour. It took me a good few rows to finally stop the stripes, but I think they're only noticeable to me (?).

This also meant that when I was finished knitting, I had SO MANY ends to weave in. I don't like weaving in ends much (who does?), so it took me at least another week to finally finish up after I was done knitting!


Overall, though I'm SO proud of this sweater! I love the lace details - it's subtle, although a little more noticeable in real life! It's also so warm and cozy, and I wear it lots, even now that it's May! It's finally warmed up a little, but the first week was pretty chilly for May.


Also, thanks to my friend James for taking these photos for me! I think this one was taken just before we decided it was time to head inside...